Thursday, December 30, 2010

Welcome Home Quhyn


My girlfriends and I made an 8x8 album for our friend Kelly's new daughter, Quhyn.

Kelly adopted Quyhn from China and was finally able to bring her home on November 20, 2010. We made the album so that she could record Quyhn's first year, and a bit, at home.

The album was originally going to be from November 2010 to November 2011, but Quyhn's 3rd Birthday is in December 2011. So it seemed more appropriate to have the book go until her birthday, so we added a month.

I did the title page, December 2011 & the last page of the book.

The ribbon on the December 2011 layout is actually a lot like the darker green colour in the mats, but with all the sparkle in it the ribbon it kept shooting as you see it in my post.

I had a lot of fun making these pages.

Saturday, December 25, 2010

Holiday Cheer - DAT'S Boxing Day Sale!


DAT'S BOXING DAY SALE!
Sunday, December 26, 2010
10:00 a.m. - 3:00 p.m.

30% Off Your Entire Order!
(Excludes better sales items, gift certificates, special orders & workshops.)

50% Off Core'dinations Cardstock

50% Off All Stickopotamus & Jolee's Stickers

This is the Christmas card that I made my daughter, Amy. She is on her school's cheerleading squad and her school colours are teal, purple & white.

I used Bazzill Dotted Swiss, BoBunny Double Dot & BoBunny 12" Winter Joy Cut Outs paper. I also used Prima Flowers, Doodlebug Snowflake brads & Basic Grey Rhinestones.

The cheerleader & the santa hat stamps came from The Greeting Farm. The sentiment stamp on the inside of the card is from CC Designs.

The Copic Markers used are: Skin - E00 & E000; Hair - E27, E29 & E25; Teal Colour - BG45 & BG01 and Purple Colour - V15.

Happy Holidays!

Friday, December 24, 2010

Season's Greetings!


Season's Greetings!

This is the Christmas Card that I made my mom. I don't normally make my parents separate cards, but since I just had to make that "Let It Snow" card (previous post) for my dad...I needed to make a special card for my mom.

As you can see, I had a lot of fun putting this card together.

I used Core'dination Cardstock, Scrapbook Sally Gold Shimmer paper and the patterned papers are from Basic Grey's 6 x 6 Jovial pack of paper.

I used Tattered Angels Iridescent Gold Glimmer Mist to add a bit of sparkle to the Bazzill poinsettias, Kaiser Craft Pearls, miscellaneous floss for the stitching, gold waffle paper from Stampin' Up & "JOY" was cut out on my Cricut Machine.

I used one of the Bazzill Stitchz Templates to create the stitched swirl, Labels Fourteen Nestability and one of EK Success' border punches for the inside of the card.

The image on the front of the card is from Kraftin' Kimmie's Christmas line and the sentiment on the inside of the card is one of CC Designs stamps.

I apologize, but I lost my list of Copic Markers for this card.

I wish you and your family a safe & happy holiday with many merry memorable moments to last you a lifetime. Say that five times fast!

Monday, December 20, 2010

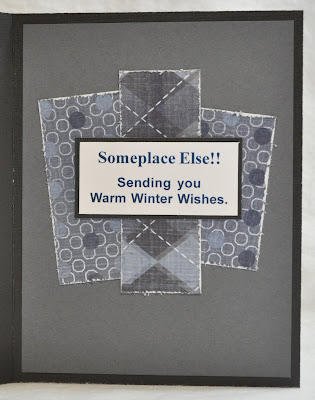
Let it Snow....Someplace Else!


This is the Christmas Card that I made for my dad this year.

As soon as I saw this new stamp from Kraftin' Kimmie's December Release, I knew I had to make this card for my dad.

My dad is retired. My mom is not retired and due to circumstances, they cannot spend their winters somewhere warm right now like they want to. My dad hates the snow and dreads every snowfall. Whenever it snows, he kind of makes a face like this mouse.

The cardstock is Bazzill & Core'dinations. The patterned papers are from Fancy Pants' Like Father Like Son line. The brads are from my miscellaneous stash.

I distressed the papers with Tim Holz's Distressing Tool. The snowflakes stamp is from Stampin' Up, the "Let it Snow" Sentiment Stamp is from CC Designs, the mouse is from Kraftin' Kimmie and the sentiment on the inside of the card was designed on my computer.

I coloured my image in with Copic Markers, but I was watching the Survivor finale while doing it and didn't keep the markers straight as to which ones were used where. So, here is the list of the markers that I used: C1, C2, C3, C4, C5, C10, B45, B91, B93, B95 & BV25.

I do want more snow for Christmas.

So....Let It Snow! Just don't tell my dad I said that.

Saturday, December 18, 2010

Holiday Wishes


This was a card that I came up with so that I had an excuse to try out my new Spellbinders Grand Calibur Die-Cutting Machine.

I used the Grand Nestabilities Grand Labels Four die-cut for the base of my card with Core'dinations cardstock.

I used "Ornaments, Christmas Bells & Candy Cane" two-sided papers from Echo Park's "Everybody Loves Christmas" line. The ornaments on the front of the card were cut out from the "Ornaments" patterned paper.

The sentiment stamps came from CC Designs "Holiday Greetings" stamp set & I used a generic red embossing powder that has been in my stash for years.

I also got to play with my new Kenmore sewing machine to add the strings to the ornaments.

This is a very simple Christmas Card that was easy to mail because there was no bulk or weight to it. It also allowed me to play with my new die-cutting machine and my new sewing machine...what more could I ask for.

Happy Holidays!

Monday, December 13, 2010

Easter/ Thinking of You Card Workshop


Thursday, March 24, 2011 - 1 Spot Available
Time: 7:00 p.m. Cost: $7.00

For this Easter/Thinking of You Card, we will be using Doodlebug's Petite Prints Double Sided Papers: Limeade Dot-Grid, Limeade Daisy-Stripe, Tangerine Daisy-Stripe, Bumblebee Daisy-Stripe & Cupcake Daisy-Stripe. For the cardstock, we are using Bazzill White & Core'dinations Tulip.

To embellish this card, we are using Bazzill 1" Primula White Flowers & Stamping Bella 5mm Solid Coral Reef Bonbons. To make the die-cuts, we are using EK Success 1 1/2" Scalloped Square Punch & 1" Square Punch.

The stamps on this card are from CTMH's "Say It in Style" and "For Every Occasion" Stamp Sets and we will be using Stampin' Up's Certainly Celery and Pumpkin Pie Ink and Pixie Pink Marker.

Birthday Boy Card Workshop


Thursday, February 24, 2011 - FULL
Time: 7:00 p.m. Cost: $7.00

This Birthday Card is equipped with a unique pocket for gift cards.

We will be using the Hoopla two-sided patterned paper from Flair Design's It's Your Day line, My Mind's Eye Brilliant "All Star" Twinkle Twinkle/Orange Circular two-sided patterned paper, BoBunny Harvest Dot paper, Tangerine Orange Core'dinations cardstock and Stampin' Up 1/4" Old Olive Grosgrain Ribbon.

The stamps we are using are from CTMH's Happy Birthday Stamp Set, CC Designs Birthday Sentiments Stamp Set and CC Designs Sugarplums Balloon Trevor Stamp. We are also using Stampin' Up's Word Window Large Punch.

Copic Markers used: Hair - Y23, Y26 & Y21; Skin - E00 & E000; Shirt - YG97 & YG25; Pants - B02 and Shoes & Belt - E47.

Anniversary Card Workshop


Thursday, January 27, 2011 - FULL
Time: 7:00 p.m. Cost: $7.00

For this Anniversary Card Workshop, we will be using the burnished velvet technique; as well as doing heat gun embossing.

We will be using "Juliet" & "Diana" two-sided patterned papers from Imaginisce's To Love & Cherish line, Metallic Silver paper, Bazzill Black cardstock & Core'dinations Dusk cardstock.

The embellishments we are using are Kaiser Craft Snow Pearls, Maya Road Black Pearl Trinket Pin, Heidi Swapp Large White Flower, Jewel Glitter Ritz Silver & Black Ultra Fine Glitter and 7mm Be Creative Tape.

The stamps used on this card are from Stampin' Up's Hostess Occasional Quotes Stamp Set and CTMH's Golden Years Stamp Set. We are also using Stampin' Up Going Gray Ink & American Crafts Opaque Black Embossing Powder.

Tools used for this card are a heat gun, Nestability's Petite Ovals Large, EK Success Small Folk Heart Punch and EK Success 1 1/4" Circle Punch.

Monday, November 29, 2010

Shanna's Friendship Recipe Box


My best-friend, Shanna, just celebrated her birthday last Friday and of course we did it in style with an evening of scrapbooking with friends.

My cousin, Brandi, and I made this recipe box for Shanna for her birthday and of course there is a story behind it.

Brandi, Shanna and I hang out together quite a bit. Since, Shanna is like family, we not only get together as friends, but for family events as well.

Shanna likes to bake and gets excited when she finds a new recipe that works well for the family. We will be out at a function or in a restaurant and eating something that is really good and Shanna will say: "I bet I can figure out how to make this at home!" Meanwhile, I am saying: "Let's make reservations soon so that we can eat this again!"

So, Shanna had made this comment enough times in front of Brandi & I that we started saying: "Let's get this recipe so Shanna can make it for us!"

Then one day, Brandi called me up and said that we should make Shanna a recipe box for her birthday and fill it with recipes for her to make us. Also, some joke recipes because we like to tease Shanna.

Funny enough, 2 days earlier I had just received the new Kaiser Craft Recipe Box in the store that I had pre-ordered 2 months earlier.

So, we started working on it immediately. Soon after we started this project, our friend, Ellena, passed away. After her funeral, a bunch of her scrapbooking friends came back to my house for a day of scrapbooking. After everyone had left, Shanna & I were talking and one of our conversations was how nice it was that we were able to pull off our "Cards for Ellena" project.

We made sure that she received at least 2 cards a week from her friends reminding her that we were thinking of her and there for her. We talked about how nice that was. We all know that we have many friends that love us, but to have that constant reminder is even better.

That was it! The next morning, I called Brandi & told her that we had to get all our girlfriends in on the recipe cards so that every time Shanna opened her Recipe Box she would be reminded of the friends who love her.

So, we contacted our friends. I took all their head shots & on their recipe cards is their photo and their hand written recipe.

The Kaiser Craft Recipe Box is very sturdy and very easy to put together. We used one of the papers from Kaiser Crafts Christmas line to cover the box.

The longest part of the project was finding the perfect, not so common, friendship quotes to fill in the 5 windows on the recipe box. I designed them all on my computer to make them fit perfectly. We used the Labels 17 Nestability die-cut to frame out the windows on the box.

On the inside of the lid, we used one of EK Success' photo corner punches, the Labels 17 Nestability die-cut & the Lyrical Cricut Cartridge for the lettering.

For the dividers, I typed the titles out on my computer and we punched them out with Stampin' Up's Large Word Window punch.

For the front of the recipe cards, we used Stampin' Up's "From the Kitchen of" Stamp Set. For the back of the cards, the lines were designed on my computer and then we used one of CTMH's "E" Size Promotional Stamp Set that has no name on it for the swirl. For the tabs on the recipe cards, we used Stampin' Up's Extra-Large Round Tab punch.

Brandi & I had a lot of fun putting this recipe box together
. I am thinking of making myself one, but since I hate cooking.....mine is going to be a photo box or an address box.

I just received 8 of these recipe boxes in the store today & 4 of them are already spoken for. I will not be able to get in any more before Christmas, so if you need to get your hands on one of these recipe boxes....you may want to get into the store sooner than later.

Bon Apetit!

Saturday, November 20, 2010

Ellena - A Good Friend Forever


Ellena lost her battle with cancer on Wednesday, November 3, 2010.

She was one of the strongest, creative, stubborn, caring, giving & beautiful person that I have ever had the pleasure of not only knowing, but who I had the honour of calling my friend.

The first 2 cards in this post are the cards that I made to go with the flowers that we all went in on for her funeral.

The "Owl Card" was attached to a big bouquet of Sunflowers that were placed in a two foot tall vase. Sunflowers were her favourite flower.

The "Thinking of You" Card was attached to a gorgeous wicker basket filled with an arrangement of Gerbera Daisies, Roses, Sunflowers & other various flowers all in rich Fall colours.

I received the "Thank You" Card in the mail this week from her husband & daughter.

We had so many people generously go in on the flowers for the funeral, that we had $100.00 leftover and I donated it towards our DAT'S Fall Yap 'N' Scrap 17 Hour Crop for the Northern Cancer Fund - Chemotherapy in Honour of Ellena Esteves.

With the $100.00 donation, ticket sales, t-shirt sales, pop sales & 50/50 draw at our Yap 'N' Scrap, we raised $835.00 for the Northern Cancer Fund - Chemotherapy in Honour of Ellena Esteves. Thank you to everyone who supported our event.

In honour of Ellena, we put in a Stampin' Up order the same weekend as the Yap 'N' Scrap and used all the Hostess Rewards to purchase products for our next Charity Stamping Yard Sale with a Twist. We were able to purchase $135.00 in products and we earned two Level Three Hostess Reward Sets. Again, thank you to everyone who placed an order.

When we add in our Charity Stamping Party donations, we raised $1,745.00 for the Northern Cancer Fund - Chemotherapy in Honour of Ellena Esteves and $905.00 in Hostess Rewards from Stampin' Up to purchase products for our next Charity Stamping Party.

I have one more favour to ask of all of you in helping me honour my very good friend, Ellena. With her in mind: take time for yourself & make a card, do something fun with your family, call up a friend & tell them how much they mean to you, give $5.00 to the next charity that knocks on your door and no matter how bad things get...hold your head up high...keep a smile on your face...fight like hell...and never give up hope.

Ellena: I love my birthday gift (a duplicate necklace of yours - the one I fell in love with the first time I saw it). When you gave it to me, you said it was so I could always have a piece of you with me. Honey, I didn't need it to have a piece of you with me. You will ALWAYS be a part of me. I have learned so much from you & I will always cherish our friendship. I love you.

Wednesday, October 13, 2010

Happy 33rd Birthday Jimmy!


Today is my brother's birthday and this is the card I made him.

There is a little story behind this card. For the past year, I have stopped making cards for my family & friends. This is due to my health. I have made the odd one her and there, but for the most part I have bought my cards this year.

I have at least 2 birthdays every month and some months are as high as 9 to 12 birthdays in one month. Then you add holidays, anniversaries, graduations, weddings, babies and so forth and so forth and a lot of my time is spent making cards.

This is why I gave myself permission to take time off from making my cards this year. I am working on balancing family, friends, work, scrapbooking, photography & me time and I hope to have a rough plan in place for the New Year. I am realistic and I know my life balancing plan will take some time to work out all the kinks, but I won't stop trying to come up with the "perfect" balance.

Well, I just couldn't buy my brother a card this year. Last year I went to make him a card with this fisherman image from the Greeting Farm. I was so excited because it kind of looks like him. To my dismay, I realized that I didn't own it. This was one of those stamp sets that I had talked myself out of.

Well, I was quite disappointed. So, the next time I had put a Greeting Farm order in, I made sure that I bought this stamp set. I am so glad that I did because I love this card. Yes, I was up very late making it and of course at the very last possible moment, but the process was so therapeutic. I lost track of time in my scrap room and it felt good.

I used Basic Grey's Pyrus 6 x 6 paper pack, Core'dinations Cardstock and some miscellaneous brads from my stash. I played with one of my new Nestabilities - Wonky Square, my sewing machine and I had fun free-hand cutting up my scrap pieces of paper for my tree. As I have already mentioned, the fisherman is from The Greeting Farm and all the sentiment stamps are from CC Designs.

I used the following Copic Markers to colour in my image: Hair - E44, E47 & E25; Skin - E00 & E000; Shirt - T3 & BG72; Hat & Pants - E57; Hankerchief - W3, YG95 & BG99 and the Fish - W1, E43, E40 & E34.

Sunday, October 10, 2010

Holiday Cheer - Take Two


Here is my "Bulk" Christmas Card for this year again, but with different papers. I have prepped to make 40 of this colour combination. I am trying to use up old paper lines from the store.

I used Smooth Bazzill & Worldwin Cardstock. I don't remember the company that the patterned paper came from and all the pieces are glued down, so I can't even check. The patterned paper is actually a very deep chocolate brown, but it kept turning out more like black in all my photos.

For the front of the card, I used CTMH's Captured Moments stamp set and I used a sentiment stamp from the Hero Arts Holiday Sayings stamp set for the inside of the card.

I used two different EK Success' border punches for the die-cut pieces.

Saturday, October 9, 2010

Happy 7th Birthday Sparkle!


Happy 7th Birthday Gorgeous!

I have mentioned in past postings how I have a difficult time taking my photos because of Sparkle getting in the way. Well, Shanna told me that I should blog photos of her getting in my way. The only difficult part is that I automatically shoe her out of my way before thinking of taking a picture of her.

Well, I finally didn't this time. I shot some photos of her before shoeing her out of the way. This is what I always go through when shooting my photos in the backyard and I thought her birthday would be the perfect day to post them.

She can be any where in the house, but she is normally at my feet or at least in the same room with me at all times. One of her nicknames that I have for her is "Gorgeous", but we do refer to her a lot as "Mommy's Shadow".

I will pick up my card or calendar page and my camera and head out to the yard. Within seconds she is right beside me. I normally photograph my cards on my 8 foot long patio stairs. The first & second photo show you what she does to me. I will be lining up the card in my view finder and then all of a sudden there is a pug nose at the top of my photo.

The reason why I pointed out the size of my stairs is because she could be any where on the stairs, but she insists on being on the one step right above where I am shooting my cards.

For my calendar pages, I normally lay them out on the lawn. She thinks that means it is time to play and she always runs across my page in hopes that I will chase her.

The 3rd photo of her is when I am taking a bunch of photos. She finally gets bored waiting for me to finish and lies down right above my card or project and rests until I am done. This photo was taken when I was shooting all the pages of Stephanie's Bridal Shower Album that we made for her.

I looked up from the pages that I was shooting and there was Sparkle right in my face, she made me laugh because I had forgotten that she was even there and she looked so damn cute!

So, all in all, at times it may be annoying to have my "Shadow" by my side every minute of the day, but I wouldn't have it any other way.

Friday, October 8, 2010

Holiday Cheer


Here is my "Bulk" Christmas Card for this year. I have prepped to make 30 of this colour combination. I am trying to use up old paper lines from the store.

I used Core'dinations & Worldwin Cardstock. I don't remember the company that the patterned paper came from and all the pieces are glued down, so I can't even check.

For the front of the card, I used CTMH's Captured Moments stamp set and I used a sentiment stamp from the Hero Arts Holiday Sayings stamp set for the inside of the card.

I used one of EK Success' border punches and medium photo corner punches for the die-cut pieces.

Thursday, October 7, 2010

CC Design Witch Card


I am making four of these cards for my great aunts. I have some family photos to send them and I don't want to put it off until my Christmas cards go out. So, I thought I would send them each a Happy Halloween Card.

I used Echo Parks Happy Halloween two-sided patterned papers, Core'dinations & Worldwin Cardstock, Karen Foster Black Organza Ribbon, Doodlebug Black Brad and Spellbinders Crown Ovals Nestabilities.

The witch stamp is Halloween Birgitta from CC Designs, the pumpkin stamps are from CC Designs, the "Happy Halloween" sentiment is from Kraftin' Kimmie and the cobwebs & spider stamps are from CTMH's Creepy Cobwebs stamp set.

The Copic Markers I used are: Hair - W5, W7 & W9; Outfit & Hat - W4, V15 & RV95; Skin - E00 & E000 and Wings - W0 & V0000

Wednesday, October 6, 2010

You Make My Heart Smile


I made this card for my friend Ellena.

The stamps used on the front of the card are from Elzybells "Stamp & Scrap" and "Stamp & Scrap Sentiments" stamp sets. The inside sentiment is from Inkadinkado.

I used BoBunny Double Dot Cardstock & papers from Basic Grey's Pyrus 6 x 6 pad. The buttons & embroidery floss are from my stash. The border punch is from EK Success and the small corner punch outs were made by using a 1/2 inch square punch & a Fiskars small square hand held punch.

The sentiment on the front of this card is so very true for Ellena & I because we met each other due to our passion for scrapbooking & card making.

She is a Stampin' Up Demonstrator and I opened the first scrapbooking store in Thunder Bay. Prior to DAT'S Scrapbooking, my store was called Sandy's Place. It was a coney dog & fry shop.

I had turned the corner store part of my store into a scrapbooking supply area and I called that part of my store, Scrapbooking with Donna. Ellena & her daughter came by to check out what I was all about and she gave me her business card. I had never heard of Stampin' Up before that day.

It came in handy because 1/2 hour later, I had a customer come into my store who had just moved to Thunder Bay looking for a Stampin' Up Demonstrator. Ellena was coming back the next day to drop off a catalogue for me, so I gave this new customer the card that Ellena had just given me.

Our friendship has been growing ever since that day.

Tuesday, October 5, 2010

Congratulations Mr & Mrs. Hyde!


On Saturday, October 2, 2010, my friends, Stephanie & Chris were married on a beautiful Autumn Day here in Thunder Bay. It was a bit chilly, but there was no rain or snow like the weather person had forecasted.

This was the wedding card that I made them. I used Core'dination cardstock, the textured brown paper is from my stash that I have had for over 7 years and the orange speckled paper is a scrap piece of Worldwin Medium Terra Cotta cardstock misted with Tattered Angels Harvest Orange Glimmer Mist.

For the embellishments, I used a piece of fabric from my stash, Kaiser Craft pearls, satin ribbon from Fabricland and gold heart brads from Making Memories. For the pocket trim on the inside of the card, I used Gold Waffle Paper from Stampin' Up's Holiday Mini Catalogue.

The sentiments used are from Stampin' Up's Hostess Level Three "Occasional Quotes" Stamp Set. I heat embossed the sentiments using my Versamark ink pad and gold embossing powder.

The wedding ceremony was beautiful, but not as beautiful as the bride. The reception was cozy & fun with a fabulous meal. The day was filled with memories that will live on forever in my heart.